Repair-bench organizers: numbered trays for screws and small parts
Updated · 9 min read
Build a numbered-tray routine around one device, separate fastener groups and a useful location record, then decide whether a printed layout suits the bench.
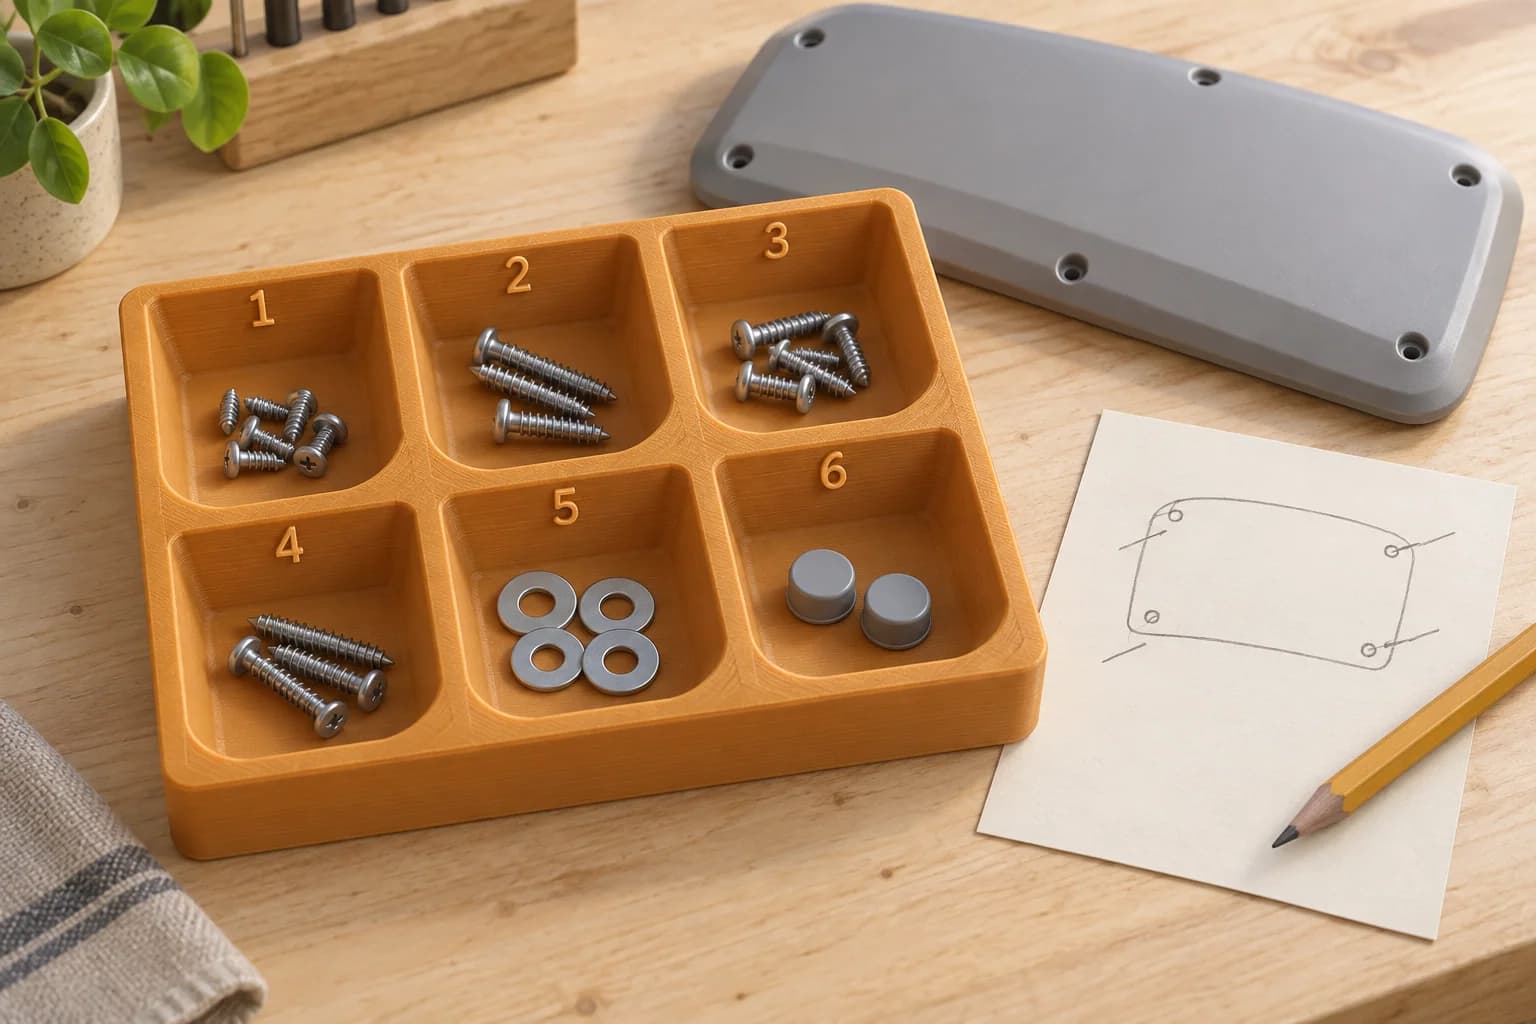
A numbered screw tray works best when each pocket points to a removal step and a record of where its contents belong. Give one device its own labelled tray, separate distinct fastener groups, and keep the notes with the parts when the job leaves the bench. The numbers provide a place to put things; the record provides a way back.
For a repair shop, the useful question is whether the organizer fits that routine. A printed tray may offer the pocket sizes, retrieval edges and bench footprint you want. An existing divided box or writable mat may already meet the need. We focus here on ordinary screws, washers, plastic caps and other benign loose parts.
Keep removal order and original location together
“All the cover screws go in pocket 1” is convenient until the cover uses several lengths. One real example appears in iFixit's lower-case guide for the 2020 MacBook Pro 13-inch with four Thunderbolt ports: its first screw-removal step lists two 6.7 mm screws and four 3.4 mm screws, and directs readers to keep track of each original location.1 That example illustrates a recordkeeping problem; it is not a disassembly procedure for other devices.
A number can describe when a group came out. It cannot describe several different mounting positions without another reference. A sketch, photograph or guide annotation supplies that information. If the same step removes two groups, assign two pockets and record the shared step number alongside each one.
Choose one numbering rule before starting. We suggest continuous pocket numbers, with guide steps recorded separately. That avoids changing the tray labels when a guide step removes no hardware or needs three separate groups. If your shop already uses step-numbered pockets, keep that convention and add clearly recorded subgroups such as 4A and 4B.
Either way, keep one fastener group per pocket and one device per tray or linked tray set. Do not merge groups because the screws look alike. Head type and length are useful identifiers, as iFixit EDU explains, but neither field replaces the location record.2
Begin with a job card, then fill the record as you go
Before any removed hardware enters the tray, attach a removable job card. Include the job identifier, device model or revision, repair-guide reference and the numbering convention. Use the same identifier on the notes and any storage container. Tray colour can be an extra visual cue on a shared bench; make the written identifier the reference.
There is a practical precedent for pairing numbered compartments with notes. In iFixit's roundup of screw-organization methods, commenter Paul Saas describes a divided box, numbers in its compartments, a paper record and a separate box for each device. That is a repairer's reported approach, rather than a measured comparison of methods.3
The following is our proposed record for a hypothetical job involving a generic exterior cover and benign trim pieces. The counts and steps are invented to show the format; they are not instructions for a real product.
| Guide step | Removed group and original location | Count | Reference | |
|---|---|---|---|---|
| A1 | 4 | Outer-cover screws, front pair, shorter group | 2 | Photo 03, front marked |
| A2 | 4 | Outer-cover screws, rear pair, longer group | 2 | Photo 03, rear marked |
| A3 | 6 | Washers beneath the left trim piece | 2 | Photo 04 |
| A4 | 8 | Plain plastic caps, left and right ends | 2 | Sketch 01 |
Pockets A1 and A2 show why removal order alone is incomplete: both belong to step 4, but their locations differ. “Front” also needs a reference orientation. Mark it on the photo or sketch rather than expecting another technician to infer which way the device faced.
Record the group as it is removed, while its location is still clear. Add the screw description specified by the actual guide where needed. Keep new spares and discarded hardware outside the removed-parts tray, labelled separately. If a tray fills up, start tray B under the same job identifier and cross-reference it on the card; do not borrow an occupied pocket from another job.
Choose pockets you can retrieve parts from
A tray layout needs to work with the smallest screw, the largest benign loose part and the way you pick them up. A neat grid on screen does not answer whether fingers or tweezers can reach a washer lying flat at the bottom.
Before ordering a set, inspect one sample on your normal bench. These are proposed acceptance checks, not results from our own tray testing:
- Place representative ordinary hardware in the pockets and retrieve it with the tools you normally use.
- Check whether a shallow scoop or rounded corner helps access without leaving too little separation between groups.
- Read every pocket number while it contains parts; labels on the floor may become hidden.
- Check that the base sits without rocking and that reaching into a far pocket does not require moving the whole tray.
- Leave room beside it for the job record and removed exterior pieces.
Configurable organizer models demonstrate how these details can vary. Kenneth Hodson's Gridfinity Rebuilt in OpenSCAD offers adjustable bin dimensions and compartment counts, plus optional scoops, tabs and stacking lips. Its creator also states that all combinations could not feasibly be tested.4 It is a design source to assess, not a verified tray in our catalogue.
Choose a larger pocket where a benign part needs one. More compartments are only useful if they preserve meaningful groups and remain easy to reach.
Pause the job without losing its identity
Waiting for a part, clearing a bench and handing work to another technician all require the record to travel with the hardware. Before moving a tray, update the job card with the last completed guide step, the reference to the latest photo and any unresolved discrepancy. A note such as “stopped after step 8; pocket A4 checked against sketch 01” carries more context than “finish later.”
Containment needs its own check. A lid can close around the outside while leaving a gap above the internal dividers. Inspect the actual lid-and-tray sample with representative small hardware over a contained surface. Check whether parts can move between pockets during the movement you intend. A stacking lip by itself gives no reason to treat the tray as closed storage.
If the design does not keep groups separated during that check, use suitable individual containers with the same pocket references, or a different organizer. Keep the matching job record attached. Do not rely on an open tray staying undisturbed on a shelf.
During reassembly, follow the correct device procedure and consult the recorded locations. The tray sequence helps recover context; it does not determine installation order, torque or which fasteners require replacement. Investigate unexpected remaining hardware against the notes and guide rather than assigning it to an available hole.
Decide whether a printed layout adds enough value
Start with the organizer already on your bench. A stock divided box may suit interrupted work. A writable magnetic mat may suit a spatial screw map. iFixit's FixMat, for example, combines a gridded writing surface with sorting bins; its magnet is specified for ferrous, magnetizable parts.5 Plastic caps and other nonmagnetic items still need a suitable place.
Printing is worth considering when a particular footprint, mixed pocket sizes, visible numbers or retrieval shape would support your chosen routine. Identify that difference before searching for a model. If a standard organizer meets the same requirements, there is no need to commission a custom layout.
Keep material selection tied to the ordinary storage environment. Prusa's guidance describes PLA as capable of good detail but brittle, with low temperature resistance; its PETG guidance describes toughness and good layer adhesion, alongside stringing and fine-detail tradeoffs.6 Those descriptions can help screen candidates. Assess the exact design and currently stocked filament rather than treating either material name as a finished-part guarantee.
This article's tray is a dry, indoor organizer for ordinary loose hardware. Keep it away from hot tools, and use the shop's appropriate equipment for sensitive electronic components. We make no ESD-protection or cleaning-chemical compatibility claim for a generic printed tray. Even FixMat's manufacturer specifies that it is not a soldering workspace.5
Prepare an authorized model for one sample
Keep the model's creator URL, exact file revision and licence or permission record together. Creative Commons licences have different conditions: some allow commercial use, while NonCommercial versions restrict it.7 A public download is not blanket permission to order paid reproduction. Follow the exact model's terms and resolve unclear permission before ordering.
Our downloaded-model guide covers this check. If the file needs layout changes, arrange those in the source model before slicing. We print authorized customer models; the order does not include CAD design or model repair.
For 3dPrintsToronto, prepare a compatible pre-sliced .3mf or .gcode. Our plate-slicing guide explains the export step. An unsliced .3mf can use opt-in auto-slicing when available. Select a compatible stocked filament in the quote flow and review the CAD quote before payment.
Order one sample to check the pockets, labels and any mating lid before repeating the layout. If the checked design later spans several plates, our multi-plate order guide explains that file workflow. Free scheduled Toronto pickup and Canada Post shipping are subject to the ordering options shown.
Ready with an authorized model and a compatible file? Upload it for a quote. For a component fitted back onto the device, use our separate replacement-part checklist to assess that different application.
If the tray must position a component for a hand operation rather than sort removed parts, use the lightweight assembly-nest checks to review locating contacts and release.
When the job pauses for a missing plastic piece, the discontinued-part decision checklist helps document the spare lookup and limited sample question on the same repair ticket.
For camera accessories rather than repair screws, the photography storage guide adds card-format identification, filter-frame dimensions and delicate-contact checks.
Questions from the repair bench
Should we sort removed screws by size or by removal step?
Preserve the device location and removal group first. Record size as another field where useful. A shop's spare-screw inventory is a separate task: mixing removed hardware into size-sorted stock would discard its job context.
Do numbered pockets replace a screw map?
Use a map or clear location notes whenever a group has several positions or could be confused with another. Two pockets may reference one guide step. The number identifies storage; the photo, sketch or guide annotation identifies where the group belongs.
Will a printed lid keep tiny screws in their pockets?
Check the actual mating sample, especially the space above dividers and around any removable partitions. If ordinary movement lets groups mix, choose a different containment method. An outer latch does not settle the internal-gap question.
Can several jobs share one large tray?
We suggest a separate labelled tray or linked tray set per device. Identical pocket numbers across jobs are manageable when each tray carries its own job identifier. Sharing pockets adds another association to maintain when work pauses or changes hands.
Sources checked
iFixit, MacBook Pro 13-inch Four Thunderbolt Ports 2020 lower-case replacement, step 1: the two screw lengths and original-location instruction. verified: 2026-10-05.
Return to text: 1
iFixit EDU, Tools and materials, “Ruler” section: head type and length as screw identifiers. verified: 2026-10-05.
Return to text: 1
Kevin Purdy, iFixit, Our readers' best tips for organizing screws during a repair, including Paul Saas's numbered-box comment. This is reported practice, not comparative performance evidence. verified: 2026-10-05.
Return to text: 1
Kenneth Hodson, Gridfinity Rebuilt in OpenSCAD, README features and testing limitation. No model from this source was printed or tested for this article. verified: 2026-10-05.
Return to text: 1
iFixit, FixMat, manufacturer description and specifications: writable grid, sorting bins, ferrous-part magnet and soldering-workspace exclusion. verified: 2026-10-05.
Prusa Research, PLA material guidance and PETG material guidance. General material descriptions, not certification of an organizer. Both verified: 2026-10-05.
Return to text: 1
Creative Commons, CC licence conditions: commercial-use, attribution, adaptation and NonCommercial conditions differ by licence. verified: 2026-10-05.
Return to text: 1
Have a sliced file ready?
Upload it for an instant quote in CAD.