3D printed corporate-event props: assembly, finishing and reuse
Updated · 9 min read
Turn small decorative event parts into a planned kit: decide where they split, approve the joints and finish, and prepare them for packing and reuse.
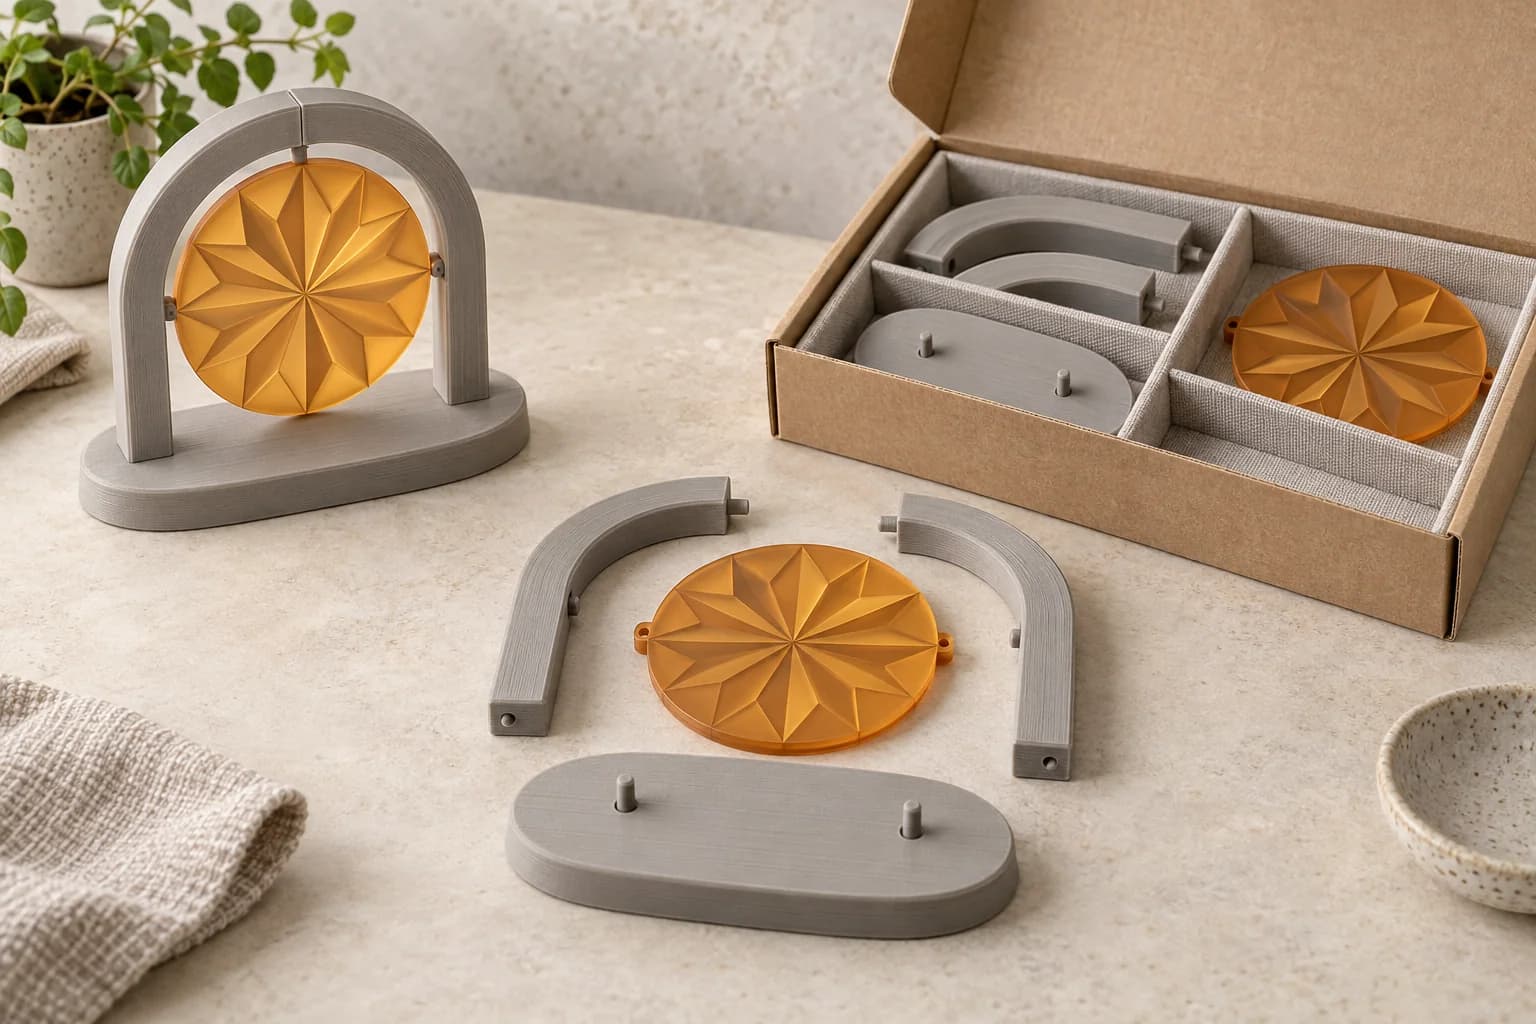
Small 3D printed event props can suit a corporate table setting when you have an authorized model and a plan for assembly, appearance and packing. A dimensional logo, original geometric decoration or removable event face needs more than a pleasing render: someone must approve the physical sample and turn the parts into a kit that the next setup crew can use.
At 3dPrintsToronto, we print customer-supplied files for small decorative work. Modelling, assembly, painting and onsite installation stay with your team or chosen specialists. This guide covers tabletop props and modest modular decorations; booth structures, suspended objects, electrical builds and food-contact pieces need a different production route.
Start with what comes home after the event
Before deciding how large the prop should look on a table, decide where it will go afterwards. Will it travel assembled? Must it fit an existing storage tote? Who will take it apart, and will that person have seen it before?
Consider a hypothetical decoration: a small grey arch with a removable amber geometric face. The frame might remain the same for another event while the face changes. Logobot, a maker in Grande Prairie, documents tabletop logo sculptures for corporate-event centrepieces and offers replacement faces for its own sign products. That is a useful example of the category and modular thinking, rather than evidence about the lifespan of our hypothetical kit.1
Choose the production method around the actual brief. If the message is mostly a flat graphic, compare conventional printed or cut signage. If an existing theme object will do, compare bought or rented decor. Three dimensions earn their place when depth, silhouette or a particular shape matters.
A finished event piece is also a different purchase from printed parts. B3D Labs describes an event-fabrication service covering modelling, printing, post-processing and finishing. A producer who needs one supplier to deliver a completed prop should seek that scope explicitly.2
Give the designer a brief that reaches beyond the artwork
Use the following planning table to assign the handoffs before preparing the plates. It is our proposed checklist, not a production standard.
| Decision | What to record | Who signs it off |
|---|---|---|
| Size and placement | Tabletop footprint, overall height, quantity and viewing sides | Producer |
| Artwork and model | Approved artwork version, model revision and permission for fabrication and intended use | Client and model owner |
| Visible surfaces | Front, rear and close-view details; where seams or support marks are acceptable | Creative lead |
| Assembly | Permanent or removable joints, part IDs, orientation and assembly order | Designer and setup lead |
| Finish | Accepted print texture or an approved coating sample; exact-colour expectations | Creative lead and finisher |
| Packing | Packed footprint, separated compartments, connector inventory and storage conditions | Production coordinator |
| Order file | Correct units, complete part count, compatible sliced plates and material slots | Person preparing the slice |
Clear both the artwork and the printable model. Keep the client's approval and the modeller's licence or commission terms with the files, including permission for paid third-party printing and the intended event use. Canada's Copyright Act addresses reproduction of a work in material form; the Trademarks Act addresses specified uses of confusing marks. A public logo image or downloadable model does not establish that your particular use is authorized.3 Our upload asks you to confirm that you own the design or have permission to reproduce it; see our terms.
Put the split where you can live with the seam
A split can help a modest prop fit the supported build area, but size is only one reason to separate parts. Prusa's official cut-tool documentation also discusses changing orientation and reducing unnecessary supports, and documents plugs, dowels and snap connectors.4
Ask your designer to put a join at a deliberate visual break where practical: between the base and upright shape, at a colour boundary or behind the removable face. Decide whether that seam can remain visible. If it must disappear, include the filling and finishing work in the production plan.
Permanent assembly keeps teardown simple, but the complete prop must fit its transport container. Removable sections give you more packing options and make a changed face possible; they also add connectors to count and joints to inspect. Neither choice is automatically better.
For the hypothetical arch, the brief might call for one unmistakable face orientation and matching hidden IDs on the two frame sections. Keep those IDs in the assembly sheet as well as the source model. A loose pin should have its own storage compartment or small closed container.
Do not approve a joint from the screen alone or borrow a universal clearance from another project. Order a representative test that includes the hardest join. Check that it seats without force, comes apart as intended and remains aligned after your own setup-and-packing rehearsal. A good first fit does not establish a repeated-use lifespan.
Our multi-plate order guide explains how to keep the sliced sections together as one order.
Approve the joint and finish together
Make the sample useful. Include the smallest visible detail, a surface that needs supports and the finish you intend to use. View it from the expected guest distance, then inspect it close up. Does the silhouette still read? Is the seam acceptable from both sides? Does the decoration sit steadily on the intended tabletop?
Visible layer texture can be an intentional finish. A smooth painted appearance requires a separate process. Prusa's post-processing tutorial demonstrates temporary assembly before gluing, then gap filling, sanding and painting; it also discusses painting differently coloured parts separately before final assembly.5 Use those as planning stages, rather than a universal adhesive or paint recipe.
Brief your finisher on the actual printed material. Ask them to approve their product system on a sample and check the mating surfaces again after treatment. Agree whether joints are assembled before or after coating, and follow the finishing products' instructions for preparation and curing before packing. Filament colour selection is not an exact brand-colour matching service.
Material selection also belongs in the brief. Prusa describes PLA as good for detail, with brittleness and limited heat and UV resistance. Its PETG guidance describes toughness and temperature resistance alongside detail and support-removal tradeoffs.67 These are screening descriptions, not qualifications for your finished decoration. Choose from compatible stock currently shown in the quote flow.
Include transport and storage conditions even for indoor decor. As a practical precaution, plan to keep the kit away from heat and direct sun throughout its journey. A different material cannot replace testing the actual shape, joints and finish.
Make teardown part of the kit
Before the first event, photograph the approved assembly and the packed arrangement. Someone looking at the packing photo should be able to tell where every component belongs.
For your own kit, prepare:
- A parts list with quantities and IDs that match the model revision.
- A short assembly order, including which faces point towards guests.
- Separate places for loose connectors and delicate decorative sections.
- Dividers or padding that stop pieces rubbing without pressing on thin details.
- A container label identifying the event version, owner and storage location.
Test the chosen packing material against the actual cured finish. Keep the assembly and packing photos with the physical kit, not only in one person's inbox.
After each event, inspect for cracks, chipped finish, changed joint fit and missing connectors. Set damaged parts aside for review before the next setup. Preserve the approved source revision and slice so a replacement component can be prepared deliberately; check its fit against the remaining pieces.
A removable face may let you retain other components when the artwork changes. That is a design option, not a promise of savings or an environmental benefit. Reuse still requires storage, inspection and renewed artwork approval where appropriate.
Prepare the parts we can quote
We accept compatible pre-sliced .3mf and .gcode files. An unsliced .3mf may use the opt-in auto-slice path where available. A logo image, vector file or raw STL is not a direct checkout input. If a designer supplies geometry, start with our STL-to-print-ready guide, then follow the sliced-plate export instructions.
Before upload, inspect every plate for units, part count, orientation, support locations and material slots. Make sure the file contains the approved revision, including any changes discovered during sample assembly. Select compatible stocked filament in the quote flow and review the parsed print details and CAD price. Our Toronto printing-cost guide explains the quote drivers.
Keep the event schedule separate from the machine-time estimate. Leave room for sample approval, possible revisions, your finishing work, curing, assembly and fulfillment. The turnaround guide explains why a short print is only one part of that schedule.
Once the files are ready, upload your sliced order. Free scheduled Toronto pickup and Canada Post shipping are available subject to the ordering options. The print order covers the selected printing and fulfillment options; your production plan covers the remaining handoffs.
For a scaled scene rather than a decorative tabletop logo, use the architectural model planning guide to connect scale and removable pieces with the presentation question.
If the object must explain a product concept, the trade-show demonstration-model guide helps choose a fixed cutaway, removable section or enlarged detail for the conversation.
When a decorative shape will also appear in a product shoot, the printed photo-prop guide checks texture, scale and shadows through the final camera frame.
Questions from event producers
Can we send a logo image?
You need an authorized printable model, then a compatible order file. Arrange modelling separately if you have only artwork. Give the designer the intended dimensions, viewing sides and assembly brief, rather than asking for a thickened logo without a packing plan.
Can a prop be wider than one build plate?
A modest decorative prop may be designed as smaller sections. Each section must fit the supported profile, and you need to approve the joints and complete assembly. Splitting a model does not bring a booth structure or room-scale installation into this service's scope.
Will you paint or assemble the props?
Plan those tasks with your own team or finisher. We print the submitted parts; painting, assembly and exact brand-colour matching are not included. An approved finish sample makes that handoff clearer.
Can we reuse the same prop at another event?
Plan for it with removable sections where useful, a complete inventory and protected packing. Inspect it before each use and confirm that the artwork remains authorized. We cannot promise a number of setup cycles or a lifespan from the model alone.
How much time should we leave before the event?
Work backwards through fulfillment, assembly, finishing and cure, sample approval, any reslicing and the current print queue. Check the ordering options for your actual file. We do not promise a fixed event turnaround in this guide.
Sources checked
Logobot: products, examples and replacement faces. Firsthand maker portfolio and service description; verified: 2026-10-05.
Return to text: 1
B3D Labs: custom event pieces. Firsthand description of its fabrication scope; verified: 2026-10-05.
Return to text: 1
Department of Justice Canada, Copyright Act, section 3 and Trademarks Act, section 20. The cited provisions do not determine permission for a particular project; verified: 2026-10-05.
Return to text: 1
Prusa Research: cut tool. Official slicer documentation; connector examples are not a fit guarantee; verified: 2026-10-05.
Return to text: 1
Prusa Research: post-processing of 3D prints step by step. Manufacturer tutorial; verified: 2026-10-05.
Return to text: 1
Prusa Research: PLA. General material guidance; verified: 2026-10-05.
Return to text: 1
Prusa Research: PETG. General material guidance; verified: 2026-10-05.
Return to text: 1
Have a sliced file ready?
Upload it for an instant quote in CAD.