Plan a Gridfinity tool drawer before ordering prints in Toronto
Updated · 6 min read
Sort the items you want to store, check the room needed to pick them up and plan a bin schedule. A hypothetical seven-bin drawer shows how to turn that list into a calculator layout.
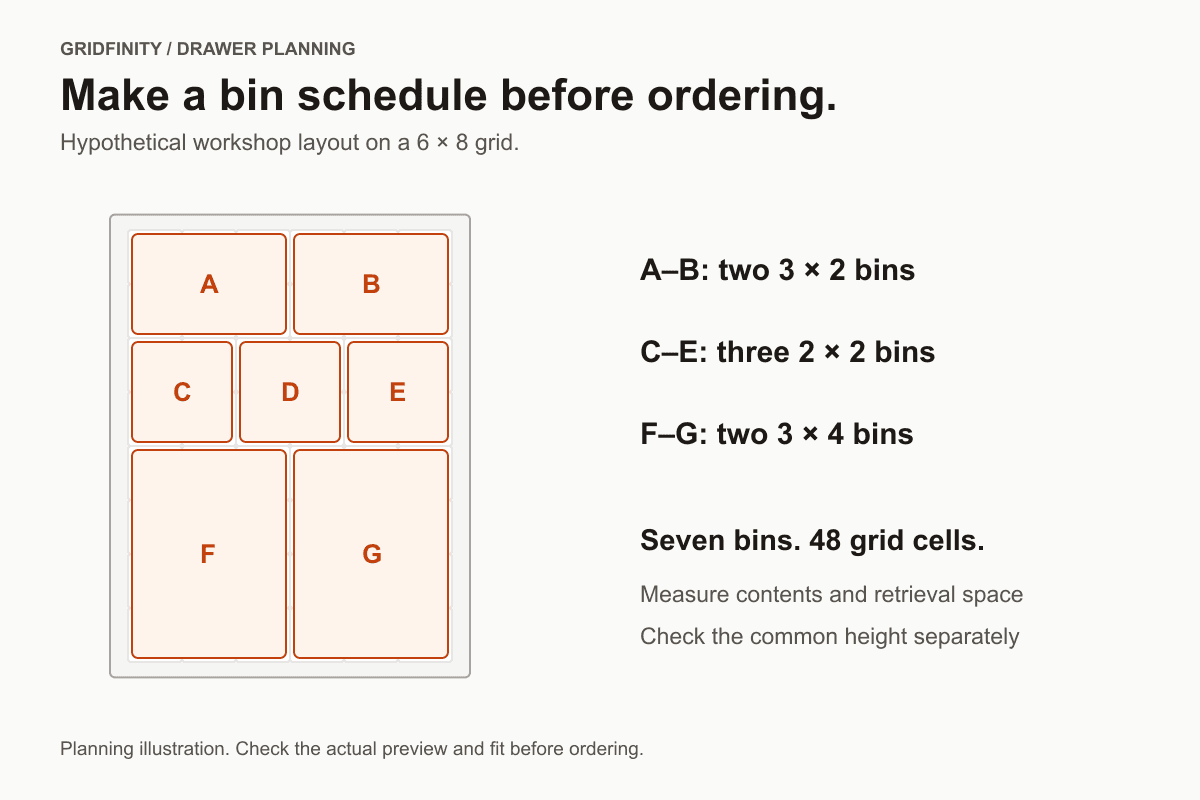
Plan a Gridfinity tool drawer by listing what belongs in it, measuring those objects and assigning a box to each useful group. Our Gridfinity calculator lets you arrange rectangular boxes within the measured drawer footprint. You can use that plan to prepare a Toronto print request with a clear bin count.
Start with one drawer for ordinary indoor tool and accessory storage. Lay its contents on a table and remove anything you intend to store elsewhere. Leave the frequently reached items within easy reach in your plan.
Measure the contents with room for your fingers
Record each object's length, width and height in its intended storage position. For a group of small items, lay out the quantity you expect the box to hold. Include handles or other projecting parts, then leave enough room to pick the contents up comfortably.
A paper rectangle helps test an arrangement before you choose bins. Put the objects inside it and try lifting them out. Write down the required usable cavity. A box's grid footprint also includes its walls and other model features, so check the actual internal dimensions before accepting the size.
Use the drawer measurement guide to choose the base's intended outer footprint and separate installation allowance. Check closing clearance with the objects in place. Our calculator uses one shared box height for the layout, accepting integer values from 11 to 240 mm.
Build a seven-bin example on a 6 by 8 grid
Consider a hypothetical 280 by 360 mm entered base footprint. The calculator produces 6 columns and 8 rows at a 42 mm pitch. The whole-cell area measures 252 by 336 mm; printed borders fill 14 mm on each side and 12 mm at the front and back.
Arrange your tool-drawer boxes
Enter your inside drawer measurements and arrange your boxes in the browser. Use Generate preview when offered, then choose an available material and review the full quote before paying.
Open the Gridfinity calculatorThe calculator shows current preview and ordering availability. For an existing model or a layout the tool cannot prepare, ask us about your print.
The following sample covers all 48 cells with seven boxes. Its suggested contents are prompts for your own measurements. They do not establish that a particular tool fits. Columns run left to right; rows run front to back, beginning at zero.
| Group | Boxes | Starting cells (column, row) | Possible contents to measure |
|---|---|---|---|
| Front | 2 boxes, each 3 by 2 cells | (0, 0) and (3, 0) | Frequently used compact tools, in separate groups |
| Middle | 3 boxes, each 2 by 2 cells | (0, 2), (2, 2) and (4, 2) | Loose accessories sorted by use |
| Back | 2 boxes, each 3 by 4 cells | (0, 4) and (3, 4) | Larger measured items or grouped supplies |
The front uses 12 cells, the middle 12 and the back 24. The boxes meet without overlapping, and each stays within the planner's 5 by 5 cell limit. That limit is an upper bound for selection; manufacturing review still checks each part against the available print area.
Rearrange this example around your own contents. If a measured object needs more cavity length, give it a larger rectangle and revisit the neighbouring groups. You can leave cells empty while retaining the base beneath them. Filling every cell is optional.
Choose a shared height you can use
Try the proposed common height against the deepest item and the smallest item you need to retrieve. A taller box may surround a short accessory so closely that picking it up becomes awkward. Check access as well as capacity.
The layout provides rectangular boxes. If your brief depends on a shaped tool insert, separate internal compartments or integrated labels, those details need an appropriate model and their own review. Keep the calculator plan focused on the box arrangement it actually offers.
Turn the layout into a useful order brief
For the sample above, your request could read as follows. Replace the example values and resolve the blank fields before approving a print:
One tool-drawer base with a 280 by 360 mm intended outer footprint. Six columns by eight rows. Seven boxes: two 3 by 2, three 2 by 2 and two 3 by 4, arranged as listed above. Common height: [chosen whole-mm value]. Inside drawer measurements and installation allowance: [record]. Closing clearance: [record]. Material and colour: [select from current options]. Please confirm the model's internal cavity dimensions against my attached contents list.
Add the quantities you want printed and whether you need both the base and boxes. If you already own a base, include its model or source and measured fit details; our baseplate-or-bins guide covers that choice. Keep the model or reviewed configuration reference with the accepted order so a later addition identifies the same design.
Review the prints and pickup options
Build your arrangement in the calculator, then use Generate preview when it is offered. If generation is unavailable, send the brief to us or use the upload route for a compatible, authorised file. The Toronto Gridfinity printing guide explains the current ordering path.
Use the Gridfinity print-cost guide to compare the complete planned set. Review the actual quote, material choices and available fulfilment before paying. For scheduled Toronto pickup, keep the agreed arrangement and contents list handy so you can check the set against the drawer you measured.
Start with your drawer measurements
Arrange your boxes in the calculator, then follow the available preview and ordering options. Review the full quote before paying.