3D printing supports: what they are and how to use them
Updated · 9 min read
Supports hold up overhangs and features that start above the print bed. Learn where to use them, how to check the sliced result and what to adjust before ordering a print.
What are supports in 3D printing?
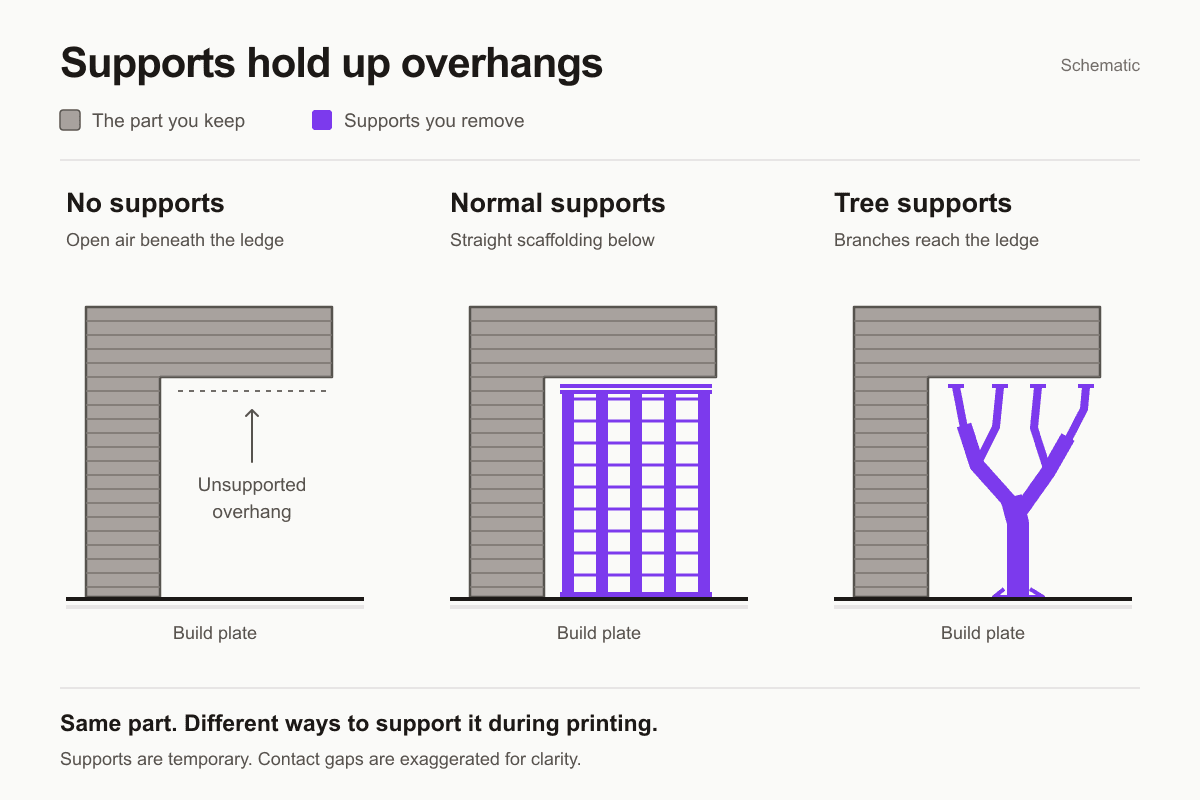
3D printing supports are temporary structures printed beneath parts of a model that need something to rest on. They hold up overhangs and features that would otherwise begin in mid-air. After printing, the supports are removed to reveal the finished shape. This guide covers filament printing, also called FDM or FFF.
Your slicer generates supports alongside the model. They can use the same filament as the part, so ordinary supports do not require a second material. Prusa's support-material guide explains how they provide a foundation for otherwise unsupported layers.
When does a 3D print need supports?
Look for features that extend beyond the layer underneath. A gentle slope can build outward a little at a time. A wide horizontal ledge has much less underneath it. A separate feature that first appears above the bed needs a way to connect to earlier layers.
- An overhang projects outward, such as the underside of a figure's outstretched arm.
- A bridge spans between supported ends, like a small doorway. Short bridges can print without extra support; span, material and settings affect the result.
- An island begins on a layer with nothing below it. Find its first layer in the preview and check what will hold it up.
The familiar 45-degree rule is a starting point, with the overhang measured away from vertical. It is not a guaranteed printing limit. Prusa's modeling guide describes how achievable angles vary with the setup. Check your slicer's angle convention before copying a threshold from another program.
Before adding support, try another orientation. For example, compare an L-shaped part standing upright with the same part laid on its side. Inspect both slices, including the faces that matter for appearance and fit. Orientation also affects strength, so the smallest support structure should be one consideration in that choice.
Tree supports vs normal supports
| Type | Structure | What to compare in the preview |
|---|---|---|
| Normal supports | Straight structures beneath the supported area. | Coverage under broad undersides and access for removal. |
| Tree supports | Branches that reach toward separate support points. | Branch placement around curved shapes and small details. |
PrusaSlicer calls its branching implementation Organic supports. Branch thickness, tip spacing and interface settings affect stability and removal. Tree supports can reduce contact and material for some shapes, but compare the actual sliced results before choosing.
For a figurine, start by checking how branches reach the hands and chin. For a part with a wide flat underside, compare normal support coverage against the tree result. Keep the orientation and other settings identical during that comparison.
How to add supports in Bambu Studio
Start with an editable model or saved project. Check the current printer and material options on our upload page, then use matching profiles. Bambu Studio provides automatic normal and tree modes; its official settings definitions document the controls below. Labels can vary by version.
- Open the model in Prepare and confirm its size and orientation.
- In the process settings, open Support and turn on Enable support.
- Choose normal(auto) or tree(auto). Manual modes generate support only where enforcers request it.
- Consider On build plate only. It prevents supports from starting on the model, so check that every required area can still be reached.
- Click Slice plate, open Preview and move the layer slider through each supported feature's first layers. Confirm that support was actually generated.
- Check removal access, filament use and estimated time. After any change, slice again and inspect the new result.
For targeted control, use support painting to enforce support under a specific feature or block an unnecessary contact. Keep required overhangs supported after each edit. Prusa's paint-on supports guide also explains why painting and enabling support generation are separate actions. Painting alone is not proof that printable support exists; check the sliced layers.
Support settings that affect finish and removal
Begin with the compatible process preset. Change one setting at a time so you can identify what improved. These controls solve different problems; one high-density setting cannot compensate for a missing support contact.
| Setting | What it changes | What to watch |
|---|---|---|
| Threshold angle | Which slopes receive automatic support. | Read the tooltip; angle conventions differ between slicers. |
| Top Z distance / contact gap | The vertical gap between support and the part above it. | A larger gap eases separation but can worsen the underside. |
| Support interface | Denser layers near the supported surface. | Balance underside coverage with ease of removal. |
| X/Y separation | Sideways clearance between support and the model. | Excess clearance can leave small edges unsupported. |
| Density / pattern spacing | How closely the supporting lines are packed. | Denser support adds material and can be harder to remove. |
The official Cura support-settings guide describes these clearance and density trade-offs. Prusa's support guide explains interface layers. Their numerical recommendations differ, which is why a copied gap value is a poor substitute for a profile matched to your material and layer height.
A zero contact gap is generally intended for a suitable separate support-interface system, such as soluble support. With ordinary same-material supports, it can make separation difficult. Check material compatibility and the available printer setup before planning a separate support filament.
How to remove 3D printing supports
Let the print cool, then work in small sections. Hold the solid part close to the contact while easing support away. Use pliers for a better grip on awkward pieces, and avoid pulling a whole support tree against a thin finger, clip or wall. Prusa's support-material guide covers manual removal and cleanup tools.
Leave room for this step when choosing orientation. A support trapped inside a closed cavity can be impossible to reach. Surfaces printed over supports can also look rougher than exposed faces, as Prusa's modeling guide illustrates. Inspect an important mating surface after cleanup before relying on its fit.
Common support problems and what to check
- No supports appear: confirm support generation is enabled, check automatic versus manual mode, inspect blockers and slice again. Then check the affected layers.
- Supports are hard to remove: review the contact gap, interface and side clearance against the material preset. Try a small test before repeating a large print.
- The underside sags: check whether the interface covers it and whether the contact gap is excessive. Also review cooling and bridging settings with the material profile. Prusa's cooling guide explains how cooling helps newly extruded overhangs hold their shape.
- A tree branch fails: inspect its bed contact, thickness and reach. The Organic supports guide describes the stability trade-offs of branch diameter and angle.
Upload a file with the supports you intend to print
For a pre-sliced order, supports must already be in the exported toolpath. Follow our slicing and export guide to save the reviewed plate as a .gcode.3mf. Keep the editable project for future changes. If you only have an STL, our STL preparation guide explains manual slicing and the available opt-in automatic route.
If our upload check flags possible missing supports, we recommend returning to the project, correcting the supports and exporting a fresh slice. Choosing Print without supports accepts the file as it is. The warning does not add supports or prove that an unflagged file will succeed.
On the website, Hide supports changes only the preview. The printed file and quoted material stay the same. To reduce support-related cost, edit the project and compare the new slice's grams and time using our print-cost reduction guide.
Ready to order in Toronto or the GTA? Upload your reviewed file for a quote, choose from the available materials and review the total before payment. Free scheduled Toronto pickup is available after your order is ready.
Frequently asked questions about 3D printing supports
Does every 3D print need supports?
No. A model with supported layers and manageable overhangs may print without them. Check the model in its actual printing orientation, including the first layer of each separate feature.
Are supports the same as infill or a brim?
Supports hold up otherwise unsupported geometry and are removed. Infill stays inside the part. A brim extends around the first layer to help bed adhesion. Adding a brim does not hold up a ledge higher in the print.
Do tree supports always use less filament?
The result depends on the model and settings. Compare total filament and time in two slices with the same orientation, then check contact coverage and removal access before choosing.
Can I add supports to an exported G-code file?
Return to the original model or editable project, enable supports and slice again. Upload the new sliced export. Renaming the file or changing its preview does not add printable support paths.
Sources checked
- Prusa: support material (verified: 2026-10-29).
- Prusa: modeling with 3D printing in mind (verified: 2026-10-29).
- Prusa: Organic supports (verified: 2026-10-29).
- Prusa: paint-on supports (verified: 2026-10-29).
- Bambu Studio: official support-setting definitions (verified: 2026-10-29).
- UltiMaker Cura: support settings (verified: 2026-10-29).
- Prusa: cooling (verified: 2026-10-29).
- Prusa: infill (verified: 2026-10-29).
- Prusa: skirt and brim (verified: 2026-10-29).
Have a model ready?
Upload a sliced file or use available STL auto-slicing. Review your quote before paying.